Selasa, 31 Maret 2015
Veronica Benavides, Senior Received B. Craig Raupe Travel Grant
Our senior, Veronica Benavides, received B. Craig Raupe Travel Grant to assist in paying for the IIDA conference. UNT Student Government Association offers travel grants each semester to students - graduate and undergraduate - attending conferences related to their field of study.
Make the Most of the Evening Light
I love it when I first notice that it is light much later in the evenings. Even though the days are still a bit chilly, it tells me that summer is indeed around the corner. This time of year is so busy with my kids' after school activities. It's so easy to get caught up in the shuttling around and forget to enjoy this wonderful time of year.
So, I thought I would give you a few images to dwell upon today.


P.S. The new issue of Australian online Magazine Adore Home is just out, and it is not to be missed. I know what I'm going to be doing when I get a little down time! M.
Curb Appeal Part V
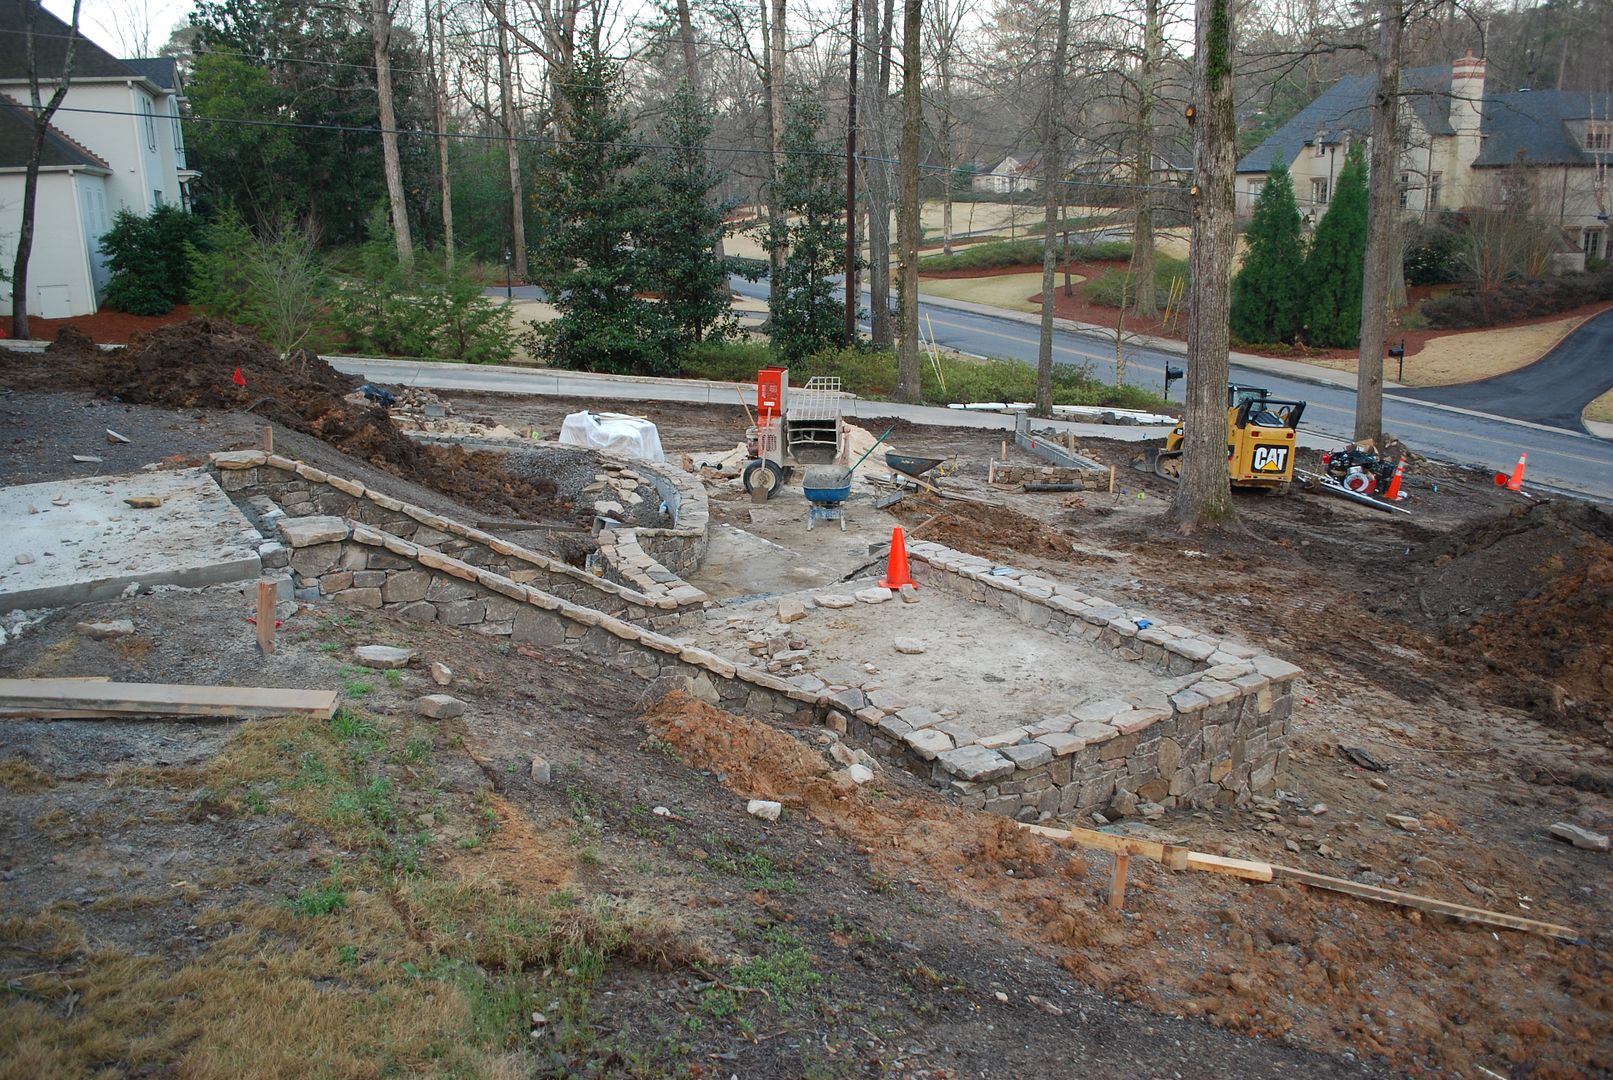
It's time for some hardscape. Once the trees were cleared, it was time to apply the design to the yard.
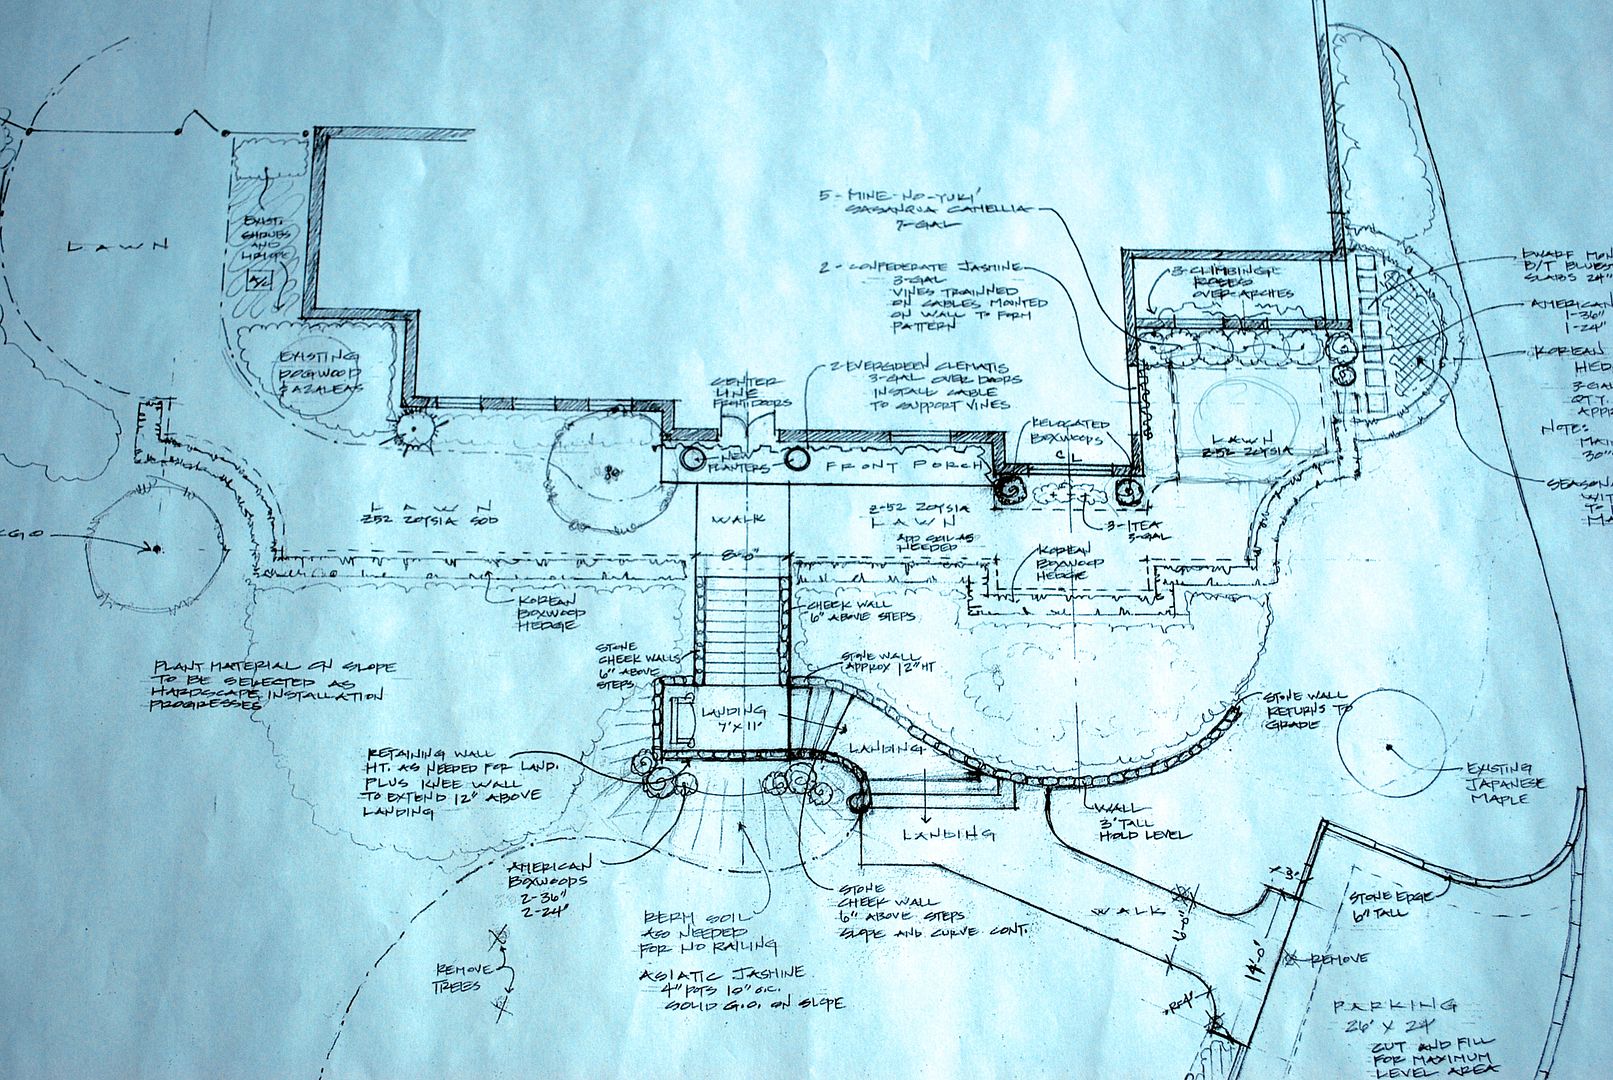
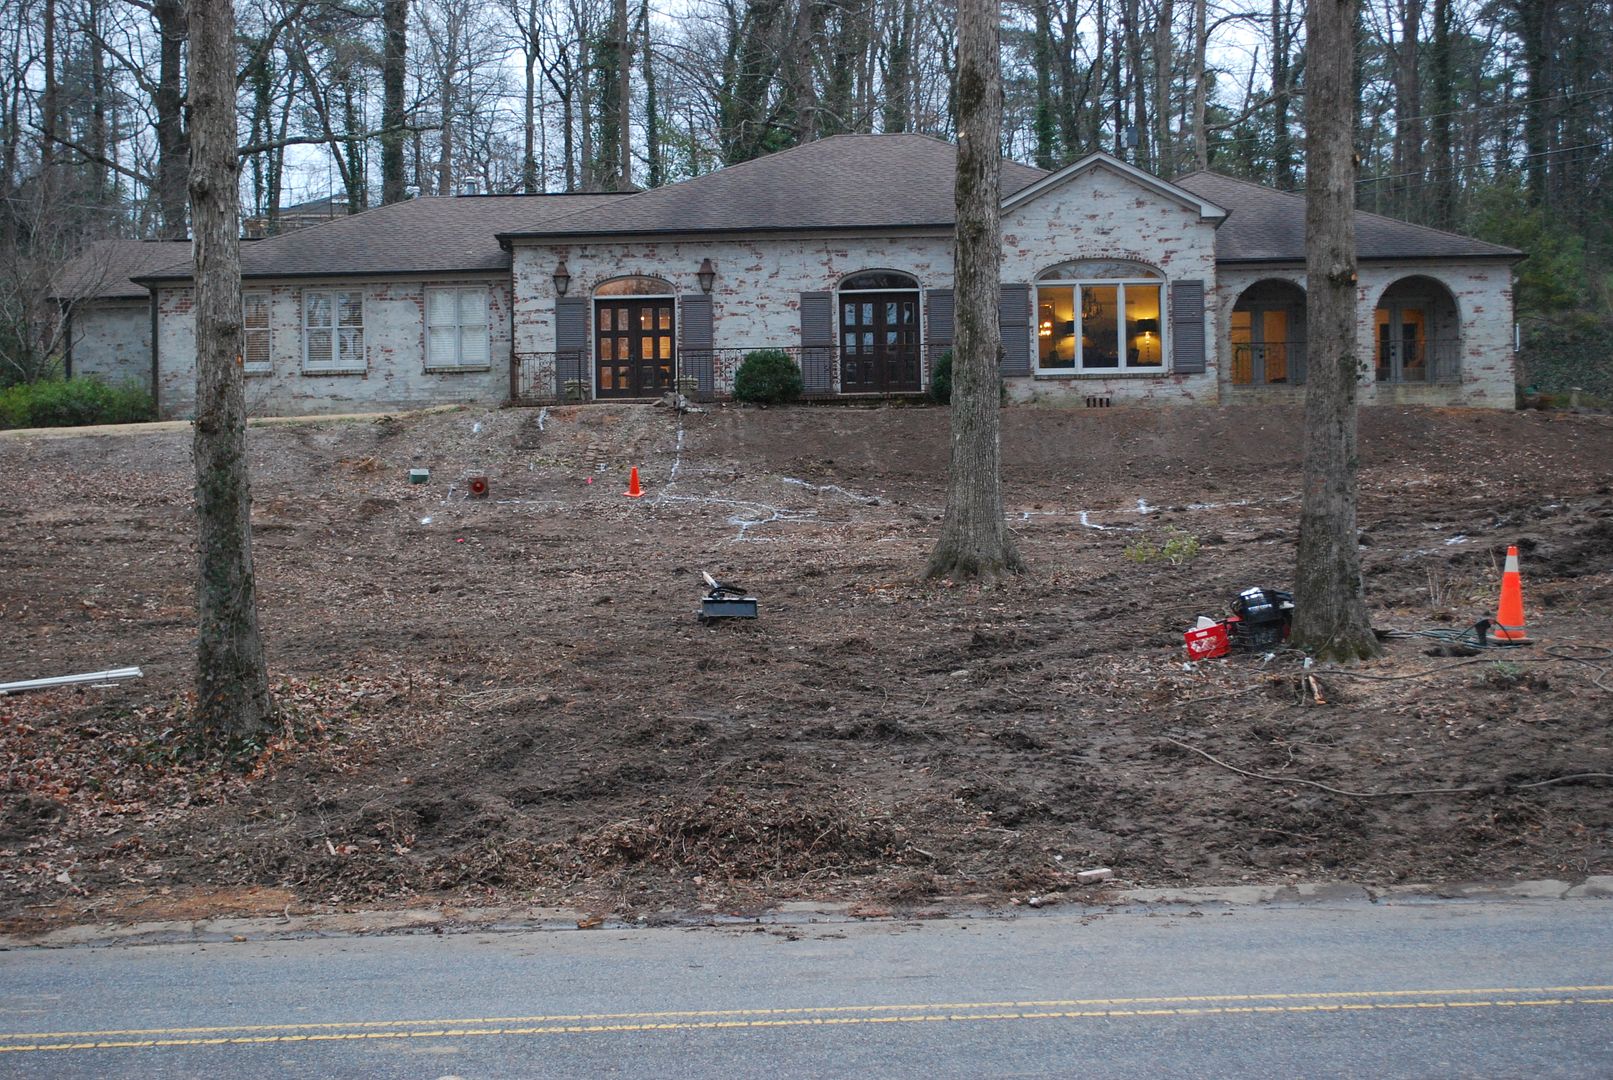
I kept thinking, "How are they going to figure this out?" Well, a very talented masonry guy (who is really great in Math) for Green Landscaping, took the drawing and careful applied it to the hill. He started by drawing the layout on the ground with white paint for us to see how it was going to look and feel. See all the white lines on the hill?
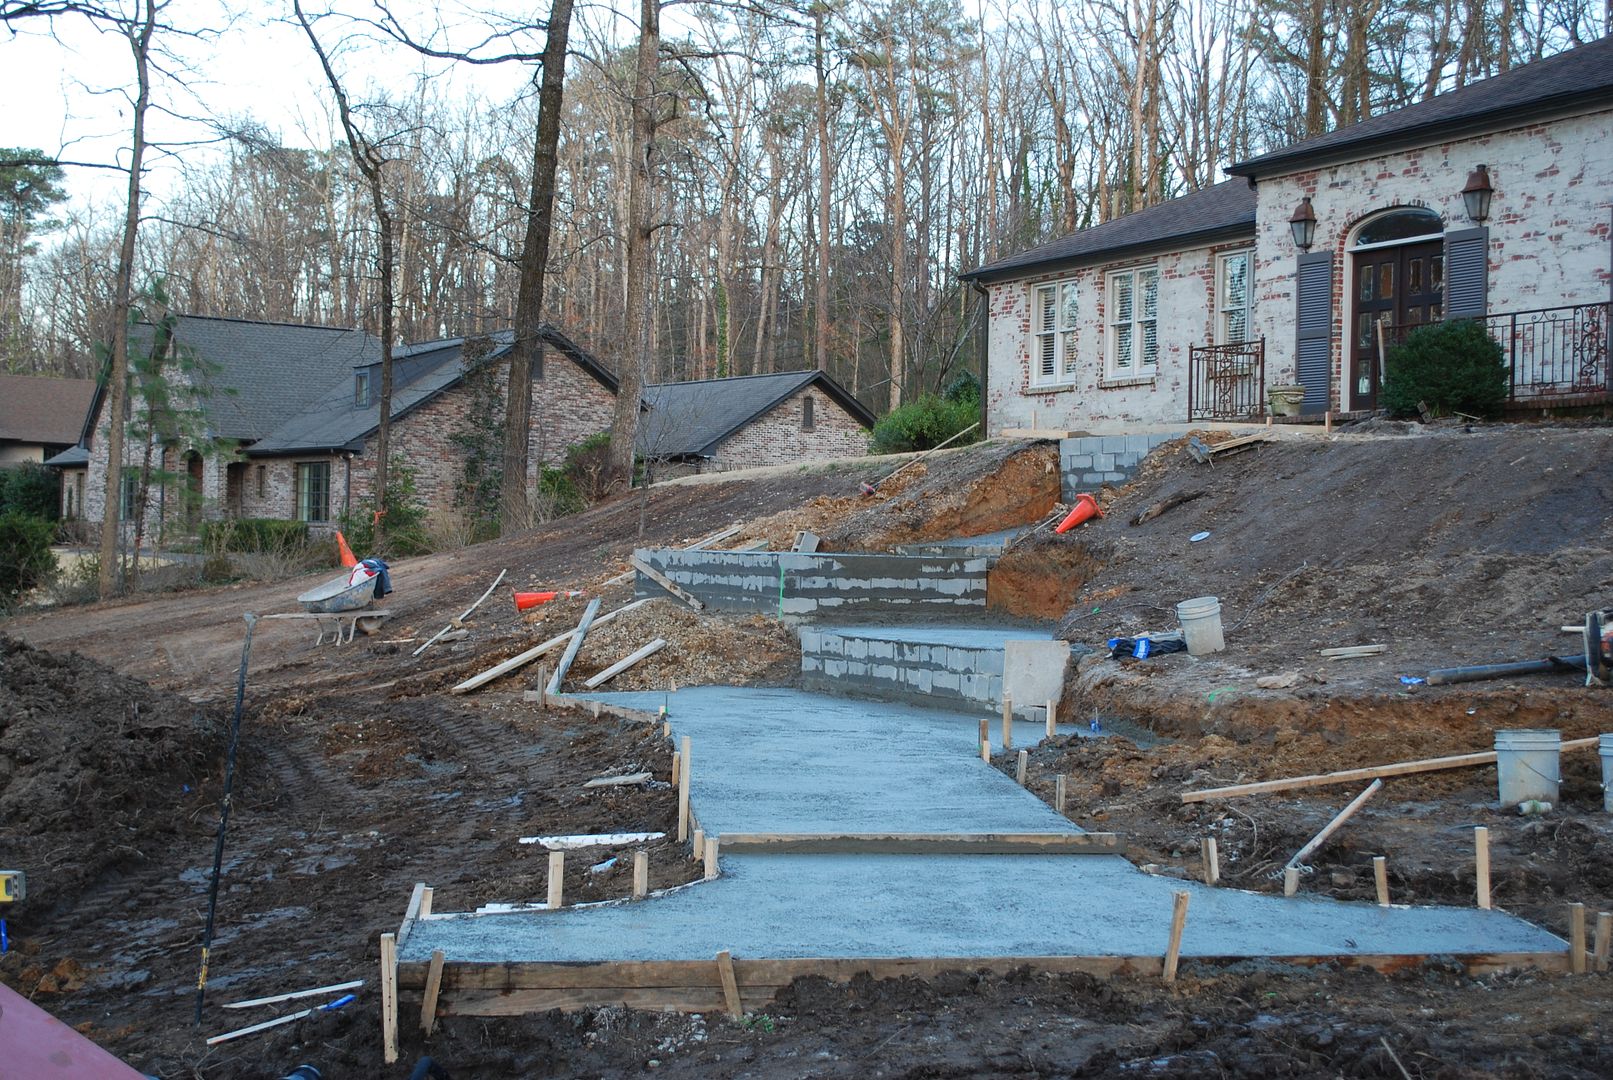
Those lines might not look like much, but they are super important. They determine the number of steps, placement of the landings, and the elevation of the entire hardscape. I cannot stress how important this stage in the process is to the entire design. Once they start pouring the concrete and laying the block, there is no going back!

Here is the poured concrete which all the lovely stone will be based on for the new design.
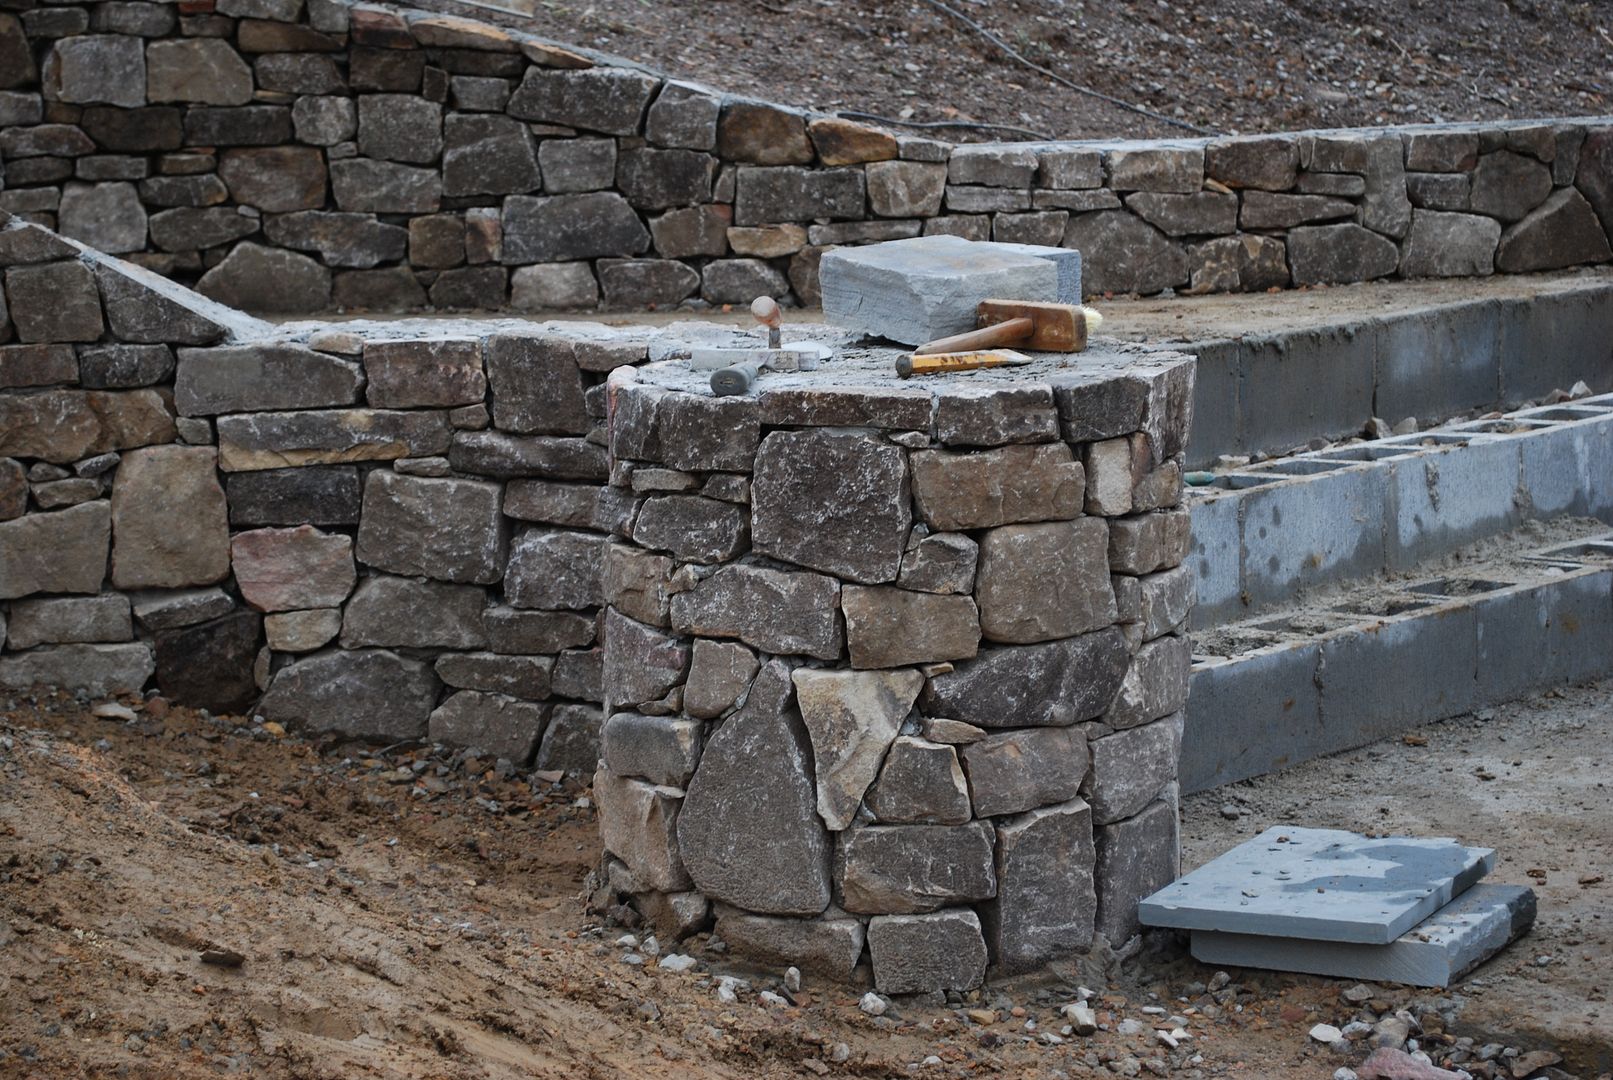
Once they started placing the stones, I quickly realized this is not a cookie cutter process. These masonry guys are true artisans. They hand chisel each stone to create a tight fit and one of a kind look. They are constantly making sure the pattern is varied and level with the block base. Really amazing to watch this process.
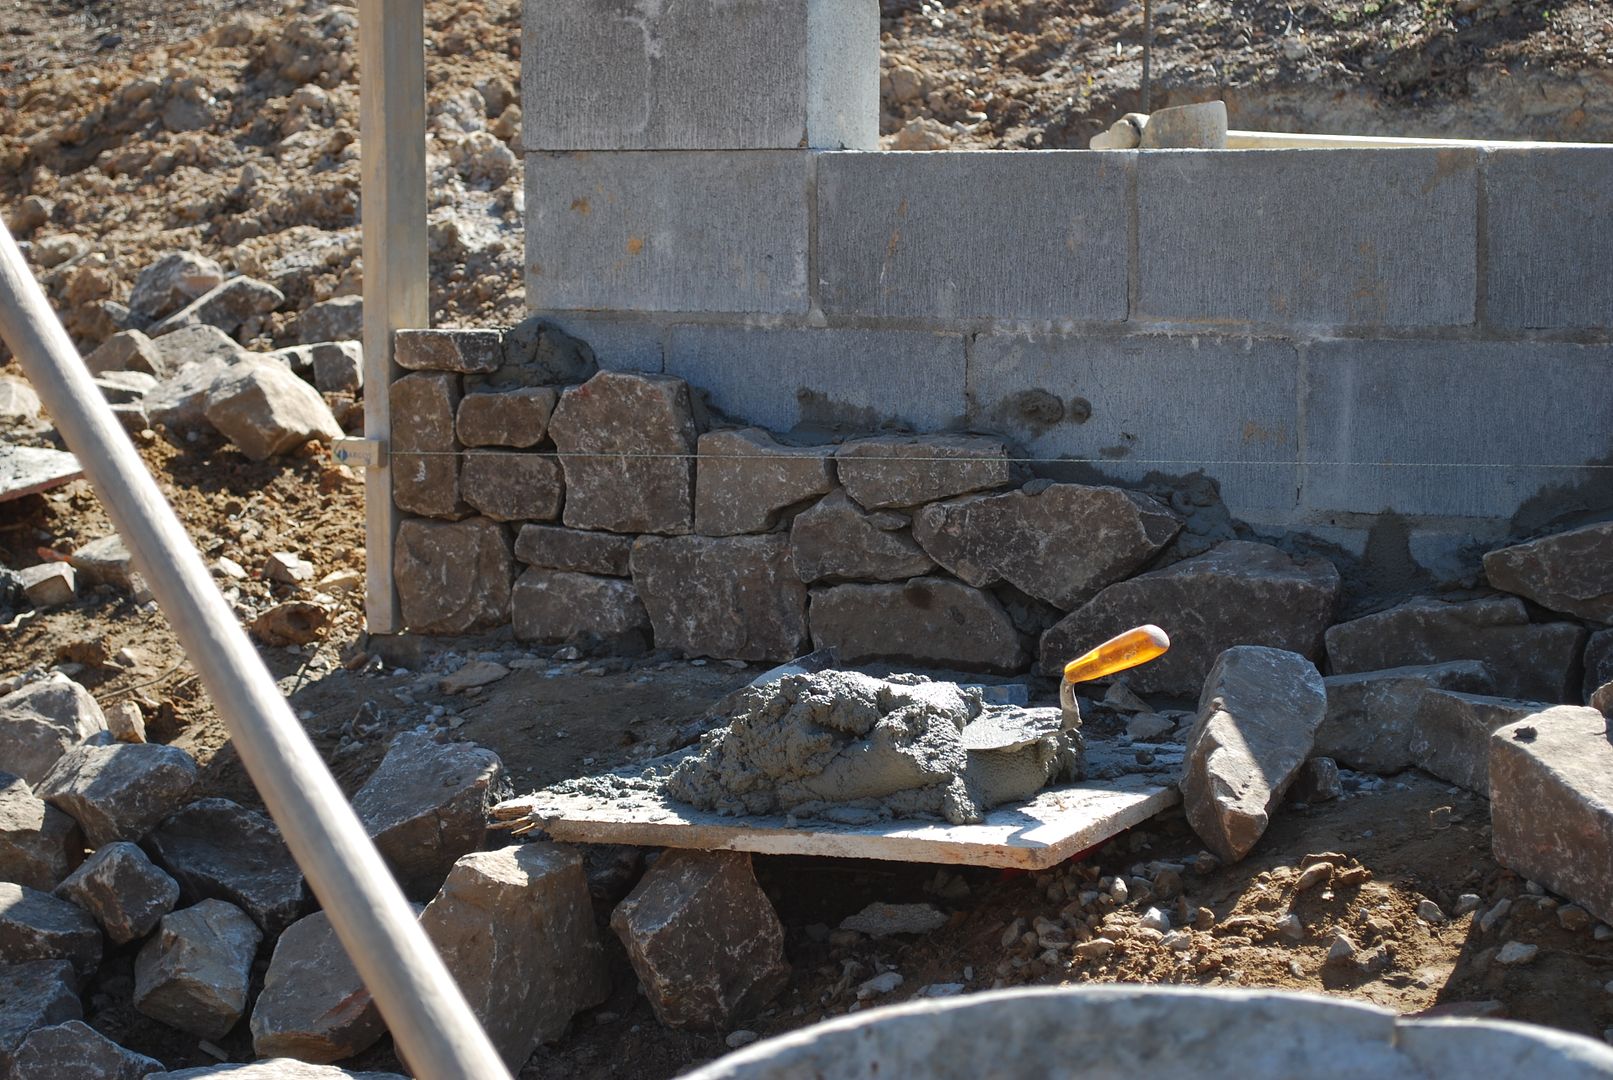
Here are a few images of how the stone work came together.

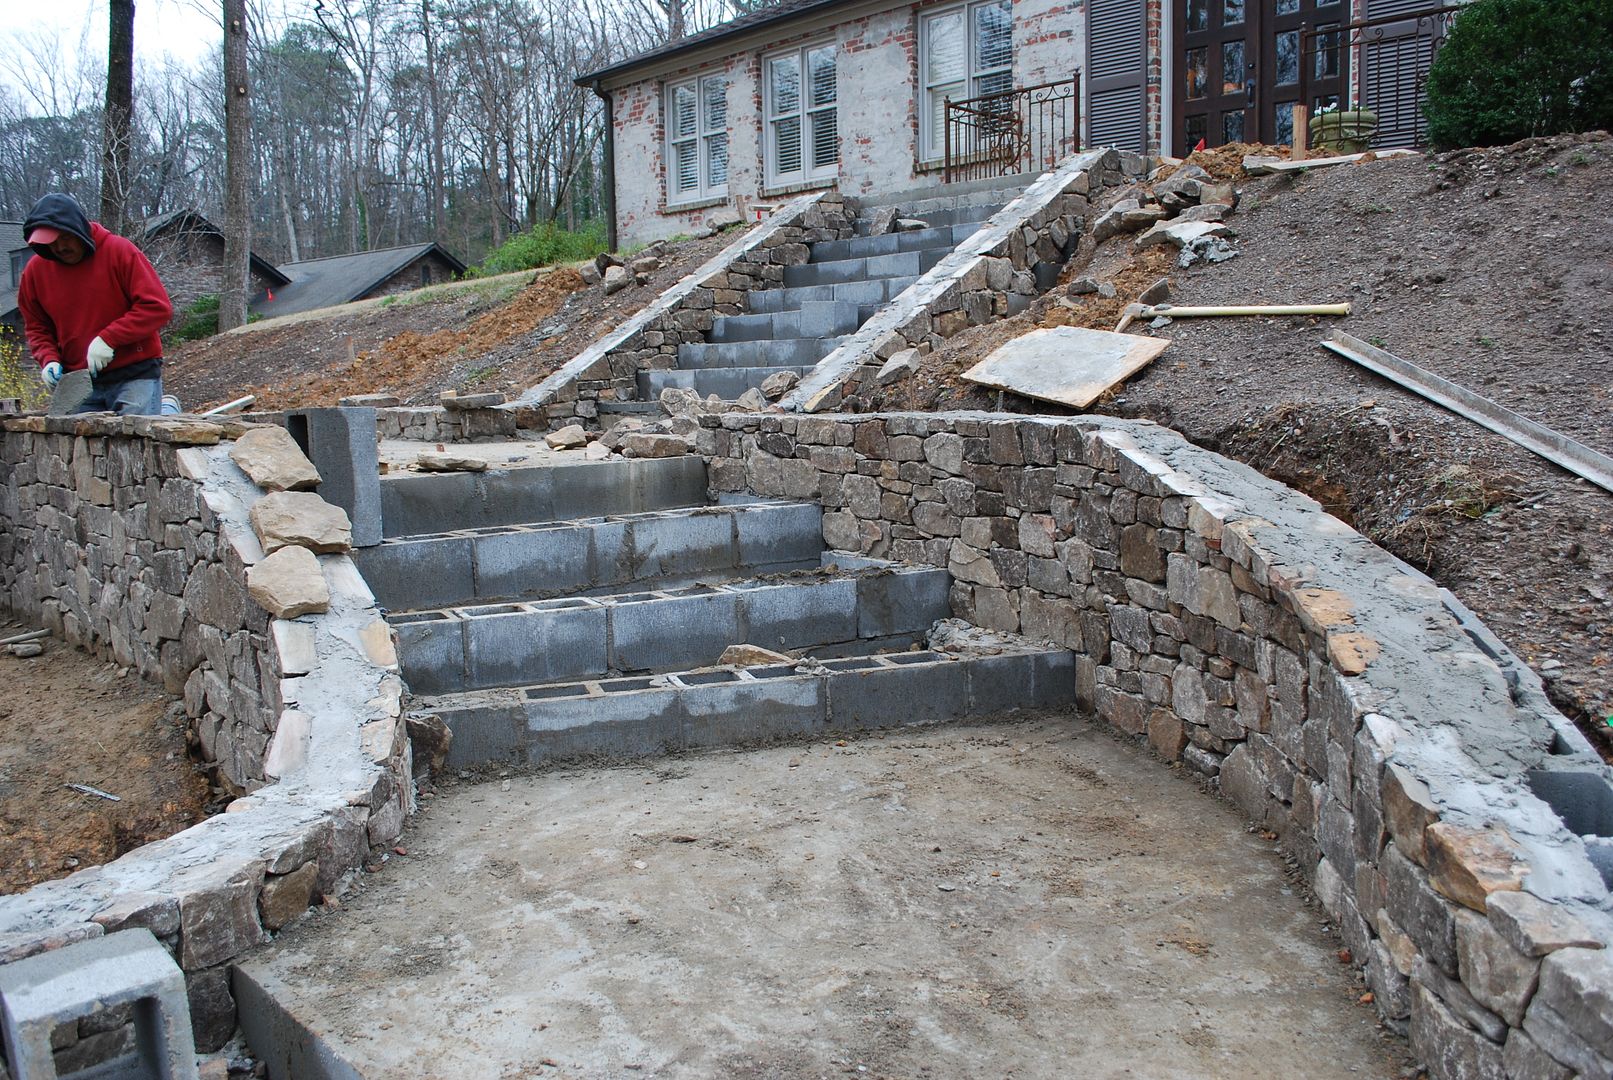
I absolutely love this rounded detail where the wall begins! It's the perfect spot for a pumpkin for Halloween! When I mentioned this, my son said, "Really Mom? You're actually thinking about a pumpkin during this project?" Sorry! Can't help it. Details like that just pop into my brain.
And here is the overall look from the street. Right now, it's blending in with all the brown dirt on the hill, but as soon as this area is planted you will be able to see the contrast.

Have a wonderful day.
Here are links to all the stages of this process. If you would like to learn more about this project.
Also, if you live in the Birmingham area and want to start a landscape project of your own, you need to contact these guys to help you pull it together! Landscape Designer Randy McDaniel and Paul Lell with Green Landscape!
Senin, 30 Maret 2015
Revit Architecture Introduction – Summer 5-Week Session II
Students who are interested should contact Phillip Park at phillippark@unt.edu
ADES4615-INTD: Special Topics-Building Information Modeling Introduction
Summer Session 5-Week II (July 12–August 13)
Tuesdays, Wednesdays, and Thursdays
9:00 AM–11:50 AM
Maximum 20 seats available
Description
This five-week long course is an introduction to the fundamentals of 3D computer drafting based on Revit Architecture 2010 with a focus specifically on interior design. Students learn the concepts of Building Information Modeling (BIM) and how the strength of the software, Revit Architecture, is employed to automate the design and the documentation process. Students explore the basic interface, tools, and 3D model creation.
Learning Objectives
The primary objective of this course is to teach students the concepts of BIM and introduce the tools for parametric building design and documentation using Revit Architecture 2010. After completing this course, students should be able to:
- Define BIM and differentiate BIM and CAD
- Understand the interface of Revit Architecture
- Understand how a Revit project is structured.
- Navigate the various views of a project using the project browser.
- Understand how Revit creates objects.
- Create a range of basic building components.
- Use working drawing tools for notation, scheduling, and dimensioning.
- Create print sets.
Prerequisites
Architectural or interior design experience using AutoCAD is highly recommended.
Free Student Copies of Autodesk Software
Autodesk website provides free software downloads for students. It includes a 13-month student version of AutoCAD 2010, Revit Architecture 2010, etc. In order to get the free software downloads, go to Autodesk website. Under Communities, you click Students & Educators. You go to Software Downloads. The link for that is as follows.
http://students3.autodesk.com/?nd=register&und=624
You fill out information (school email is required) for registration. In a few minutes you will receive an email with a link to activate your account for immediate access to free, full student copies of Autodesk software. Click on the link in that email and your account will immediately be activated.
Note: The email will be delivered to you from the email address https://students2.autodesk.com/studentcommunity@autodesk.com Please be sure this address does not auto-forward into your SPAM or Junk folders.
Trina, You Rock!
Here are just a few of Ms. Turk's 2011 Spring fabric offerings from Schumacher. Would be perfect for freshening up a bit on the patio!!!!
These remind me of a fantastic resort pool.
O cabana boy - can we get some refreshments over here!
O cabana boy - can we get some refreshments over here!

These remind me of the beach. I would even consider a swimsuit coverup in that peacock fabric! But wait, she's already got that covered - Friends, if that didn't make you want to hit the gym, nothing will!

Have a great day! M.
Minggu, 29 Maret 2015
Project in Progress - Big Girl Room
Just wanted to share a project I'm working on for a client. She read the posts I did on a Bedroom Freshen Up and Playroom Dreaming and wanted me to do the same for her daughter's room!
Here's the story - She's moving her daughter out of the crib into a real bed and wants to give the room a big girl look without breaking the bank. For starters, she already has the bed which is a lovely amber colored spool bed (sorry I don't have a picture, but take my word for it, it's lovely). She also has a bedside table in a similar tone of wood. In addition to the bed, she has roman shades (left from the previous homeowner) in a pink window pane fabric that is trimmed in a thin green tape. (I have encouraged her to use these since they are in great shape and since pink is the color of the year!)

She also has a simple matelasse coverlet and bedskirt in white. So, a basic start to a room! Also, I will tell you that my client is young and hip and wants something unexpected, maybe even a bit sophisticated for this space. The main reason is this room also acts as the guest bedroom when family and friends come to town, so it needs to play double duty. Lastly, she is on a tight budget for this "freshen up" so every single dollar must add tons of impact. The goal was to keep it around $350.00.
OK, so that is what I started with and here are two options I have given her for the room. Why Two? Because a girl needs options (and because I simply cannot help myself when I start working on these projects!)
Option #1 is just a bit more expensive at a grand total of $345.44.

Option 2 has a brighter, bolder feel, but would also make a fun big girl room.
The grand total for this "freshen up"- $322.49.

I would love to know which you prefer! It might help her make a decision. M.
Art In The Garden - James Farmer
About a month ago, I was near Auburn for a guest bedroom installation. After finishing, I managed to grab some lunch, and I snagged a copy of a local flower magazine. The entire magazine was great, but what really caught my eye was a full page ad for Art in the Garden at Auburn University featuring none other than James Farmer.

Are you familiar with James Farmer? He is considered a Southern lifestyle expert - that includes all things related to entertaining and styling. The guy's amazing.

 via
via
Well, he's coming to Auburn Saturday, April 14th for an evening of sheer bliss. From what I can gather, he will be creating flower arrangements and chatting it up with guests the entire evening. There will be a seated dinner and lots of other loveliness. The proceeds go to supporting the Gardens in the area. The sad news for is is that we are going to be out of town. So, if any of you do decide to go, I would love a full report!!
Who knows, he may even be signing copies of his most recent book.
Who knows, he may even be signing copies of his most recent book.

Here is information on getting tickets for the evening - Art in the Garden with James Farmer
PS: I'm still digging out from my break. Why do breaks have to be this way!? M.
PS: I'm still digging out from my break. Why do breaks have to be this way!? M.
Spring Entertaining
Thought you could use a little inspiration for your Easter or Passover table.

Whether you are hosting a crowd or having a marvelous brunch for your immediate family this weekend, make it special!


Happy Weekend. M.
Sabtu, 28 Maret 2015
IFDA Student Scholarships Available
The International Furnishings and Design Association Educational Foundation (IFDA) is offering 6 undergraduate and 1 graduate Scholarships in 2011. Awards range from $1500 to $3000, and categories support community service, sustainable design, part-time enrollment, marketing and furniture design. Application requirements include work that you already have in your portfolio. Deadline for entries is March 31. Please see http://www.ifdaef.org/ for application information.
UNT Interior Design Team Project Selected As Top Three Southwest Regional Finalists to National IDEC Competition
The UNT Interior Design team project of Tonia Finger, Bridget Williams, and Larry Joe Byer was selected as top three Southwest regional finalists to the IDEC (Interior Design Educator Council) Student Design Competition. The UNT team designed a college space that met the design challenge with a focus on cultural diversity, multiple learning styles and innovative technology under guidance by Interior Design faculty, Cynthia Mohr and Ty Lee. The Southwest region had eighteen submissions to the competition this year and the top three were sent forward to the IDEC national conference in Indianapolis, IN to compete among all regions. There were fifteen total projects brought to this level of the competition from schools across the U.S. and Canada.
The 2012 IDEC competition challenged interior design students to create an innovative college learning space that considered past and present teaching methodologies and the use of technology in the learning environment. The given parameters included the use of existing materials such as wood paneling and brick and space requirements that included a café, a classroom, and a lounge area.


The 2012 IDEC competition challenged interior design students to create an innovative college learning space that considered past and present teaching methodologies and the use of technology in the learning environment. The given parameters included the use of existing materials such as wood paneling and brick and space requirements that included a café, a classroom, and a lounge area.
University of North Texas Interior Design Team Project
Students: Tonia Finger, Bridget Williams, Larry Joe Byer
Faculty: Cynthia Mohr, Ty Lee


Work with What you have

Are there are times when you look at certain rooms in your home and think, "Can I just start over?" The reality is few people have the luxury of starting completely over with a room. So, we must work with what we have. The key is to embrace it and make it work!
You would be amazed at how fantastic a room can look simply by working with what you have. These are pictures of some of my favorite redesigns I've worked on over the years.
Everything you see in these photos, the homeowner already had. There are no new pieces - just her furnishings moved around a bit.

There is a fireplace opposite this chest which balances the room.

This wall was stark and a bit depressing.

Making it the perfect place for a vignette. The homeowner had these lovely nude etchings; and when grouped together, they create a point of interest.

Different homeowner in this photo. This was a formal living room and the biggest problem with this room - the windows on the right were not centered on the wall or on the fireplace, so the sofa was not working on this wall.

The solution - float the sofa and place a long sofa table (which was hidden behind those two floral slipper chairs) on the window wall. The two club chairs were upstairs in the homeowners master bedroom. By trading them with the floral slipper chairs, you get this wonderful view when you first enter the home.

This was one of my the very first redesigns. Obviously, just cleaning up helped! But, I also created some interested on the long wall to the left by separating the entertainment unit and using the two side panels as one large bookshelf.

This made the seating area feel more cozy.

Also notice, you don't have to put the books on the shelf in such a conventional way. Think outside the box.

This was a small sitting area on the main floor of this home.

By moving the large sofa and chair to the downstairs TV room (since you want to be able to lounge in front of the TV), this space became more of a reading niche or even a place to relax in the evening.

This was one of my favorites - very challenging layout (there was no wall for the sofa in this space). Notice the dining room in the "L" shaped space beyond. In this case, flipping the living room and dining room solved the problem. That gave the sofa a wall!

This allowed me to create this beautiful vignette as the first thing you see when entering the home. The artwork was done by the homeowner's son, and she simply adored being able to see it when she first walk in her home.

I hope these give you inspiration for your own home. Remember: Before you throw the baby out with the bath water, think of the possibilities!!!
Hope you have a marvelous day. M.
PS: My friend Marie over at Howard House Reviews has awarded me the Stylish Blog award! I love it when other bloggers recognize your efforts. It makes my day (just like lovely comments do)! If you get a chance you should check out Marie's blog. She helped promote by most recent giveaway and has daily finds (if you are in the mood for free stuff). Thanks Marie! Also, if you would like to read about my "seven things" I posted about it here.
Project - Living Room II
Here are pictures from a living room project I've been working on over the last year or so in Crestline. For those of you outside of Alabama, Crestline is one of the four villages or areas in the city of Mountain Brook. It's a lovely area with lots of gorgeous homes ranging from large tudors to small cozy bungalows all within walking distance to lots of fabulous shops and restaurants.
My clients live in a cozy bungalow that has tons of character. They are young and hip and not afraid of color. In this case, we embraced the fabulous Heriz rug they already owned. We played up the putty brown tones in the rug and used them on the window treatments (which my client made) and upholstered pieces. We then pulled out the grays and teals of the rug by way of artwork and accent pillows. That's the wonderful thing about a Heriz - you can always find a color in them you love.
My clients live in a cozy bungalow that has tons of character. They are young and hip and not afraid of color. In this case, we embraced the fabulous Heriz rug they already owned. We played up the putty brown tones in the rug and used them on the window treatments (which my client made) and upholstered pieces. We then pulled out the grays and teals of the rug by way of artwork and accent pillows. That's the wonderful thing about a Heriz - you can always find a color in them you love.

photo by Alison Gault
We also mixed traditional and modern elements in the space. This allows the interiors to blend and "fit" with the style of the house (which is rather traditional) while still reflecting the more modern personalities of the couple who call this space home.

photo by Alison Gault
My clients love to entertain, and they use every single room in their home. They also have two small children. So, the goal with this project was to give them affordable high style (by using lots of items they already owned) while keeping it comfortable and kid friendly.

photo by Alison Gault
Here is just one small example of all those elements. This accessory is made of brass which is totally current and modern. It was also not expensive (under $35). It looks very fragile - but truthfully, you can throw it across the room, and it still looks great. So all the elements exist - affordable, high style, kid friendly.

photo by Alison Gault
When planning this design, the goal was to make every piece in the space count. The buffet acts as storage while giving us a fabulous secondary focal point. It also brings in a rich wood which every space needs. The coffee table while beautiful is still large and sturdy enough to act as an ottoman where you can actually kick your feet up. Lastly, the ottoman in front of the bergere' chair acts as additional seating during a gathering. Make every piece count.

photo by Alison Gault
This mirror is very old and has been in my client's family for years. By layering some modern pieces on top of it, we have created a current look.

photo by Alison Gault
Believe me - You really can have affordable high style that is also comfortable and accessible. It just takes some thoughtful planning. M.