Minggu, 31 Mei 2015
Ashley Henderson Selected for Southwest Airlines NoLimits Internship
Ashley Henderson, UNT Interior Design 2013 graduate, has gained a spot as one of two Corporate Facilities interns with Southwest Airlines this summer at the Dallas Headquarters location. The Southwest Airlines NoLimits Internship includes numerous areas of study and is highly competitive. This summer 13,700 applied and only 84 were accepted. As an intern Ashley will gain hands on experience by assisting with SWA Headquarters upgrades and airport site management.
Hanging Artwork in Bookshelves
Artfully arranging bookshelves requires some skill. The trick is to show off your accessories in an effortless way. It's a balancing act - too much and they look over styled, too little and they feel disjointed and cluttered.

The most important thing to remember is bookshelves are an opportunity to create something special and unique in your space. They offer a source of variety - you can constantly rearrange them to give you a different look depending on the style you are going for at the moment.

One thing I love to include in bookshelves is artwork. If your bookshelves have adjustable shelving, this is super easy to do.

The most important thing to remember is bookshelves are an opportunity to create something special and unique in your space. They offer a source of variety - you can constantly rearrange them to give you a different look depending on the style you are going for at the moment.

Here are the steps to properly hang artwork in your bookshelves.

Decide where you want to create the artwork vignette, making sure to maintain symmetry with the other shelves in the unit. You may need to remove a shelf or two to create an opening large enough to accommodate the artwork.
This is a picture of the bookshelves in our family room (at least a section of them). You can see the artwork in the larger opening I have created by removing one shelf.


Select the artwork - preferably from somewhere else in your home (there is no need to buy something new). I like to select pieces that will bring a bit of color into the space.
This is a photograph from a client's home and a great example of incorporating a darker framed piece of artwork into lighter toned bookshelves.

Remember, artwork can include a mirror, plates, or really anything you we are clever enough to hang vertically on the wall.
This is a photograph from a client's home and a great example of incorporating a darker framed piece of artwork into lighter toned bookshelves.


Create the complete vignette for the shelf before hammering your first nail! You need to make sure you are going to be happy with the entire shelf and how it reads, before you hang the artwork. Take into consideration the space below the piece and how it's going to look overall.

Image
In my home, I chose to center the artwork. But because the opening is large, I needed to include additional accessories to "fill in" around the smaller scale piece.


Image
In my home, I chose to center the artwork. But because the opening is large, I needed to include additional accessories to "fill in" around the smaller scale piece.


Properly Hang the Artwork.
Most built-in bookshelves have a floating back (meaning there is a space between the back of the unit and the wall). So, if you attempt to nail straight into the back of the unit, the nail will go straight through and not support the weight of the artwork. You'll then be left with an ugly hole in the back of the shelving unit.
Here's my solution. Hang all artwork on monofilament from the shelf directly above the artwork.

Voila. You have the look.
Most built-in bookshelves have a floating back (meaning there is a space between the back of the unit and the wall). So, if you attempt to nail straight into the back of the unit, the nail will go straight through and not support the weight of the artwork. You'll then be left with an ugly hole in the back of the shelving unit.
Here's my solution. Hang all artwork on monofilament from the shelf directly above the artwork.

Here's a close up of what I'm talking about. The stack of books to the left go in front of the nail and hide the hardware.


Here are my favorites for getting the job done. I never leave home without these when I'm styling a client's home!
Monofilament
Clear 60 lb. test Monofilament (or as we like to call it here in the South "Deep Sea Fishing Line")

Small Picture Nails
I like these nails because they have a prominent head that will not allow the monofilament to slip off.
I like these nails because they have a prominent head that will not allow the monofilament to slip off.

Self Adhesive Hooks
If the homeowner does not want a nail hole in the shelf, I use a self adhesive backed hook like this. To use these, you place the hook flat on the above shelf with the top facing out (hope that makes sense!)

Girly Hammer
I like this particular hammer because A. it's pink and B. it's only 12 oz. so you can easily handle it.
I like this particular hammer because A. it's pink and B. it's only 12 oz. so you can easily handle it.

Bumpons
It's very important to use these on the back of the artwork to prevent the picture from sliding and becoming crooked on the wall. They are also super helpful for photo groupings to keep the series straight on the wall.

I hope this gives you a new trick to use in your home! Have a wonderful short week. M.
It's very important to use these on the back of the artwork to prevent the picture from sliding and becoming crooked on the wall. They are also super helpful for photo groupings to keep the series straight on the wall.
Find of the Day - Vintage Horn Box
I picked up this small horn box from one of my new favorite online sources for unique, affordable, vintage finds . . .


They have such a nice mix of interesting vintage accessories. It's totally worth a look see. If you have a minute to peruse, here's the link.


And here's where it landed.

The source for this little jewel.

How cute is that card they included in the box?! Minty is a brand new shop - the brain child of three very fun, seasoned bloggers in Atlanta who know a thing or two about interior design.
They have such a nice mix of interesting vintage accessories. It's totally worth a look see. If you have a minute to peruse, here's the link.
PS: And if just need someone to give a gift to, I'm happy to email you my address. M.
Thinking Outside the Box
The main reason most people stay in the box is because it is oddly comforting. To step out can be scary. I think it can be scary because generally people can be judgmental. But here's the news flash - people will be judgmental regardless of whether you are in or out of the box. So, think about that the next time you are considering stepping out as it relates to your home.

If you do venture out, you may find it to be completing liberating! But you don't have to jump straight away into the deep end. With my clients, I usually provide little "pushes" that still work with the rest of the pieces in their home. Just remember, stepping out takes practice.
The trick is to take small steps on occasion. Then, the occasions will become more frequent; and before you know it, you won't remember where the box was or why you wanted to be in it.
 via
via
So, for those who need some suggestions. Here are just a few ideas to try this Summer. Let's get your feet wet. Shall we?
If you do venture out, you may find it to be completing liberating! But you don't have to jump straight away into the deep end. With my clients, I usually provide little "pushes" that still work with the rest of the pieces in their home. Just remember, stepping out takes practice.
The trick is to take small steps on occasion. Then, the occasions will become more frequent; and before you know it, you won't remember where the box was or why you wanted to be in it.
So, for those who need some suggestions. Here are just a few ideas to try this Summer. Let's get your feet wet. Shall we?
Step 1
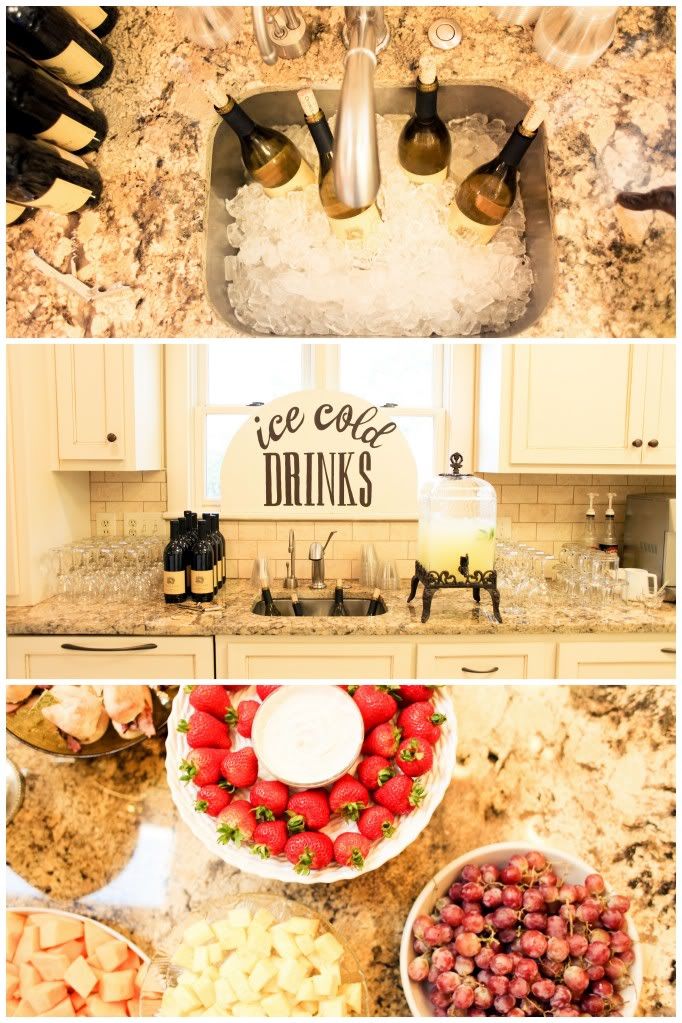
Host a gathering, and set the Bar up using your kitchen sink. Try it, it'll be fun.

Step 2
Add one unexpected Pop of color - maybe the color of the year?


Step 3
Host a dinner party and invite two couples you've never invited to your home. Don't just stick with your besties on this one - step out.

These days most people got out for dinner. So, believe it or not, the rare occasion when someone invites you to their home becomes very special.
Step 4
Rearrange your family room so the TV is no longer the main focal point!

I did this in my own family room last summer, and we never seemed to watch TV. The main seating area was on the opposite side of the room. So, we usually hung out and talked or played cards - very refreshing change for the summer.
Step 5
Consider restyling your accessories for the summer.

It's fun to go out and pick up some inexpensive accessories and then blend those in with your other things. Or, look around your closet for something interesting to use - even a sun hat can be interesting! I love switching up my accessories for the summer months. Then, when Fall arrives and I pull them back out, they feel new again. This also forces you to try them in new and unexpected places.
Who knows? If you step outside the box, you may create something wonderful.

Have a great day! M.
Have a great day! M.
Sabtu, 30 Mei 2015
A Day to Remember
Whatever you are doing this long weekend, I hope you'll stop and take some time to truly remember all those who have sacrificed their lives for our freedom to do as we so choose here in this great land.
It's in their honor I post today. These are things that remind me of being an American and enjoying this wonderful place I call home.


 I am much humbled by the sacrifices of so many. M.
It's in their honor I post today. These are things that remind me of being an American and enjoying this wonderful place I call home.


Jumat, 29 Mei 2015
Study Club
Over the past couple of years, I've been getting together with a few girlfriends on random Friday afternoons here and there. We don't have a set schedule, just when we can all fit it into our week. What do we study, you ask?
Well, life, I guess.

We chat about our families, share thoughts and ideas on our children and their activities, have a cocktail or two, and eat some yummy food. It is such a highlight for me. I know it sounds crazy, but these study club friends have changed the way I think about life.

Well, life, I guess.

We chat about our families, share thoughts and ideas on our children and their activities, have a cocktail or two, and eat some yummy food. It is such a highlight for me. I know it sounds crazy, but these study club friends have changed the way I think about life.

So, we had our year end finale a couple of weeks ago at my house. These girls are so easy to please and will try anything you throw at them! I decided to do "one bite" appetizers this go around.

The Menu


I also used a homemade dressing on the french baguette - just to make them more interesting. If you are inclined, you could also add avocado.


I then topped the whole thing off with a balsamic glaze (you can find it at almost any grocery store these days). The glaze is thicker and richer than a balsamic vinegar and does not make the the tomatoes release their juices so your plate stays pretty.


The trick here is to use pre-made shredded pork and the bagged cole slaw with your favorite blue cheese dressing. I also splurged on pre-made gourmet angel biscuits that I popped in the oven to reheat.

There was only one of these left at the end of the party and my cute hubby came in and whisked it away!

OK, I know this picture makes the desserts look green (bad choice of platter color on my part). They are not green (I promise), rather a creamy wonderful vanilla color!

Sshhh, don't tell anyone, I made these desserts in votive candle holders. Smaller servings are great way to make a heavy, decadent dessert, more appropriate for the summer.


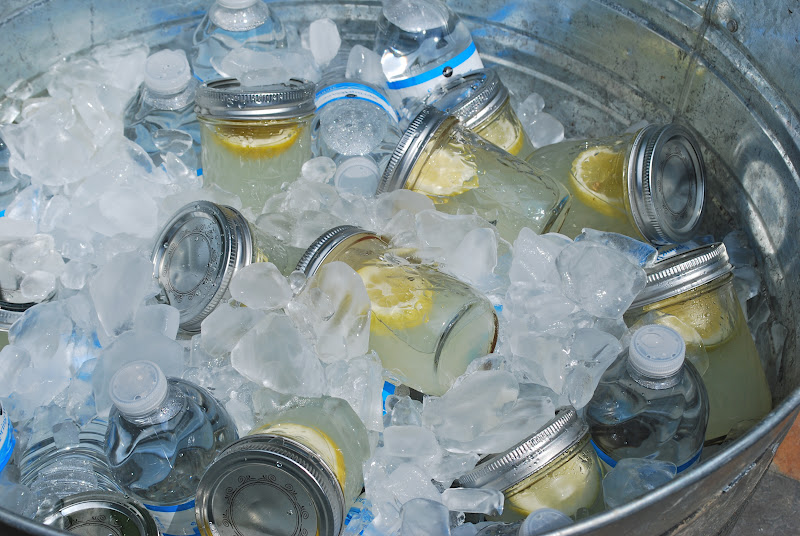
I think this is a wonderful alternative to soda and you can make a ton of lemonade with just one bag of lemons - crazy how much it will make!

I added a splash of lavender infused vodka, for those in mood for a libation!

I saw this mason jar idea on Pinterest and just had to try it.
Now, I challenge you to come up with a fun group of girls and host a "study club."
You'll be surprised how much fun it can be! Hope your week is going great so far. M.