Happy Monday! I hope you had a wonderful weekend. We are finally feeling the crisp weather here in Birmingham and just in time for Halloween. I love it! Saw this cute picture on Pinterest and had to share it. Halloween is such a fun holiday that I have an entire Pinterest board just for clever ideas for the occasion. If you need some inspiration check it out here.

My daughter asked me last week "If you had to pick a season and it would be that season for the entire year, which one would it be?" (she's 11 years old, so we do a lot of this) After some thought, I realized I don't have a favorite but look forward to the change of season the most. I'm a girl who likes change. So, I'm looking forward to everything the cooler months bring to the table - like a cup of hot tea in the afternoon, cozying up with a blanket and a family night of board games. Now that I'm feeling inspired, I plan to post on a few cool weather thoughts for interiors. Look for those in the next few weeks.
For today, I wanted to follow up my post last week on When To Consider a Drapery Wall with "How to Layer Artwork on a Drapery Wall." As an aside, this post took some time to pull together, and I'm hoping it will make sense to you!
The process of layering artwork on a drapery wall has a few of basic challenges which are not unique to any room:
1. Challenge One: light coming through the drapery panel so you see the outline of the window/door you're trying to hide
2. Challenge Two: A heavy painting/artwork resting on the drapery panel crushing it against the wall.
Neither of these are a good look!
In addition to these basic challenges, I had a couple that were unique to my project:
3. Challenge Three: The ceilings were a double story high in this room (so the technique of hanging the artwork from the ceiling was not an option for me),
4. Challenge Four: The opening we covered was so large the majority of our painting did not have a wall to "rest" on behind the drapery panel. So, it was a bit of a challenge to pull off.
I often hear people say "Oh yea, I've seen that! It would be easy to do." But when you actually try to pull off a similar look, it never turns out the same. I think this can be said for many attempts of a drapery wall. The key is to really think about what you want the end product to look like and consider all the practical issue related to that process. The result will be a fantastic, polished look.
For starters, always use a drapery panel with blackout liner when creating one of these. We even used interlining to give our panels even more weight. If not, you will be able to see the window/doorway through the fabric on a bright sunny day, and all your work will be for nothing! There are a few ready made versions of panels with blackout liner or you can have a seamtress make you a custom set. This is a very important layer not to be skimped on when creating a drapery wall.
Easiest Method for Drapery Wall
When you have actual wall (not a window/doorway) in the spot where you are going to place your nail for hanging your artwork, you can simply hang the artwork on the wall.

I like to use two panels in these situations so you have an opening in the center for your nail to come through and allow you to hang the painting. Then you can adjust the two panels to appear as one. Also, if the painting you are hanging is light weight (like a wrapped canvas) you are not going to have issues with the weight of the artwork crushing your draperies.


My daughter asked me last week "If you had to pick a season and it would be that season for the entire year, which one would it be?" (she's 11 years old, so we do a lot of this) After some thought, I realized I don't have a favorite but look forward to the change of season the most. I'm a girl who likes change. So, I'm looking forward to everything the cooler months bring to the table - like a cup of hot tea in the afternoon, cozying up with a blanket and a family night of board games. Now that I'm feeling inspired, I plan to post on a few cool weather thoughts for interiors. Look for those in the next few weeks.
For today, I wanted to follow up my post last week on When To Consider a Drapery Wall with "How to Layer Artwork on a Drapery Wall." As an aside, this post took some time to pull together, and I'm hoping it will make sense to you!
The process of layering artwork on a drapery wall has a few of basic challenges which are not unique to any room:
1. Challenge One: light coming through the drapery panel so you see the outline of the window/door you're trying to hide
2. Challenge Two: A heavy painting/artwork resting on the drapery panel crushing it against the wall.
Neither of these are a good look!
In addition to these basic challenges, I had a couple that were unique to my project:
3. Challenge Three: The ceilings were a double story high in this room (so the technique of hanging the artwork from the ceiling was not an option for me),
4. Challenge Four: The opening we covered was so large the majority of our painting did not have a wall to "rest" on behind the drapery panel. So, it was a bit of a challenge to pull off.
I often hear people say "Oh yea, I've seen that! It would be easy to do." But when you actually try to pull off a similar look, it never turns out the same. I think this can be said for many attempts of a drapery wall. The key is to really think about what you want the end product to look like and consider all the practical issue related to that process. The result will be a fantastic, polished look.
For starters, always use a drapery panel with blackout liner when creating one of these. We even used interlining to give our panels even more weight. If not, you will be able to see the window/doorway through the fabric on a bright sunny day, and all your work will be for nothing! There are a few ready made versions of panels with blackout liner or you can have a seamtress make you a custom set. This is a very important layer not to be skimped on when creating a drapery wall.
Easiest Method for Drapery Wall
When you have actual wall (not a window/doorway) in the spot where you are going to place your nail for hanging your artwork, you can simply hang the artwork on the wall.
I like to use two panels in these situations so you have an opening in the center for your nail to come through and allow you to hang the painting. Then you can adjust the two panels to appear as one. Also, if the painting you are hanging is light weight (like a wrapped canvas) you are not going to have issues with the weight of the artwork crushing your draperies.

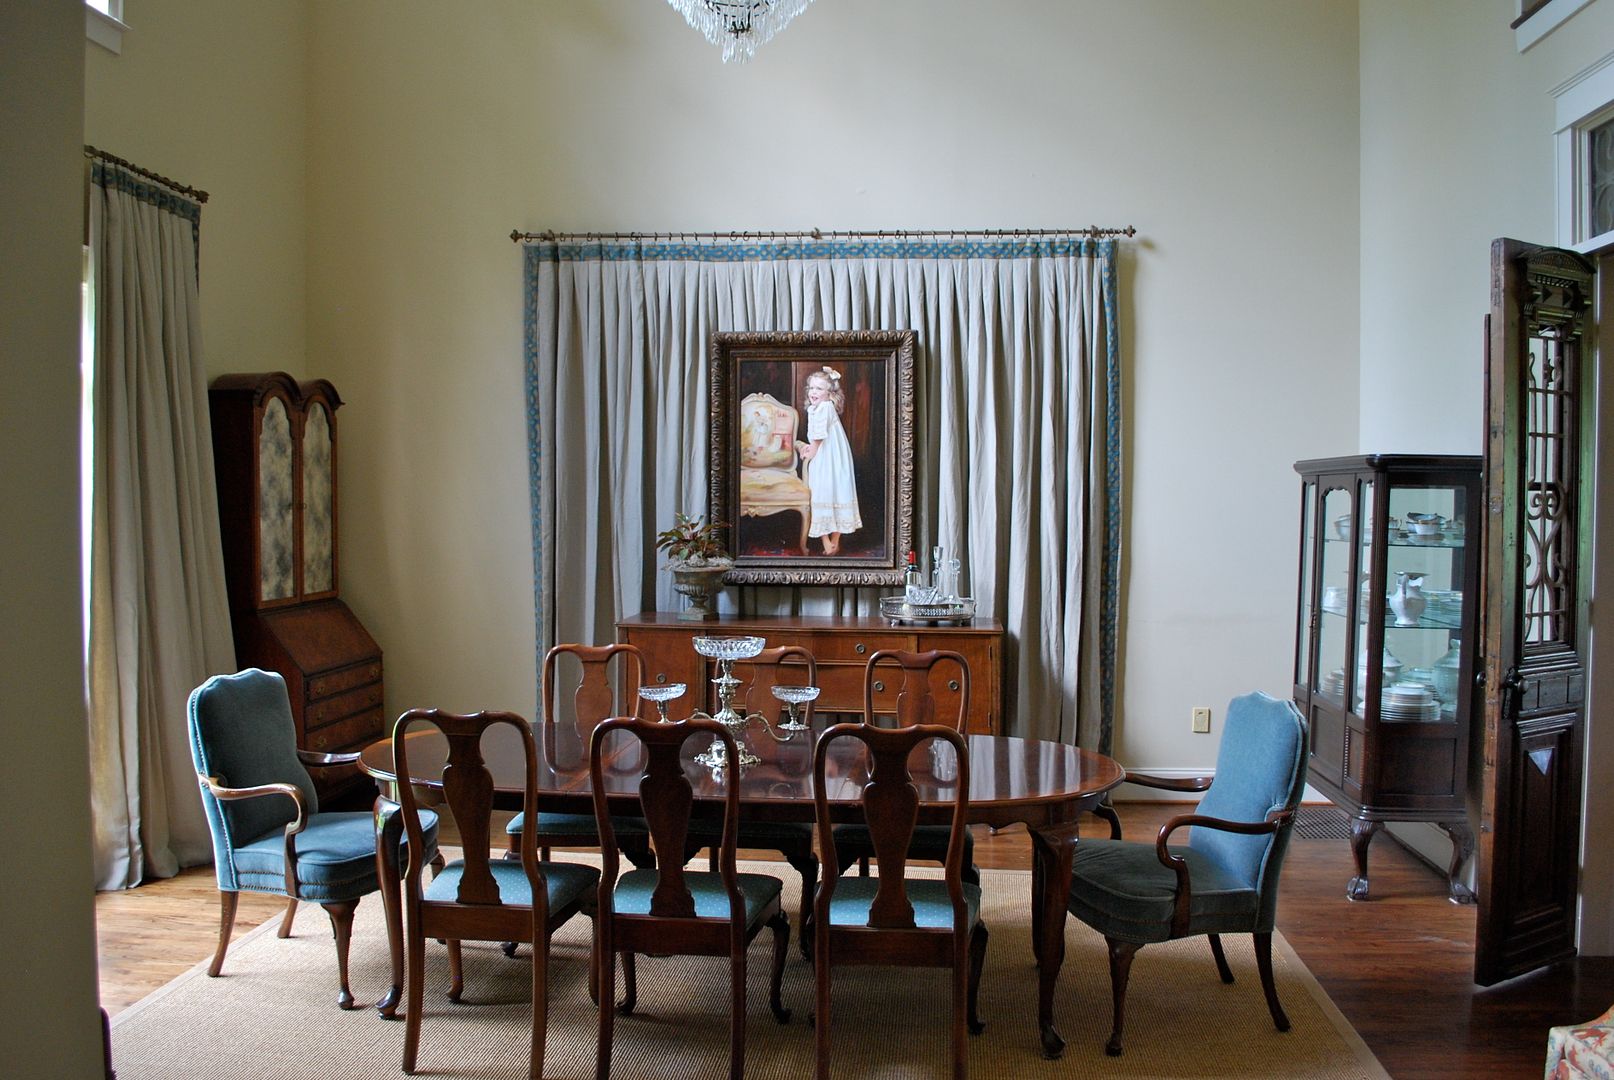
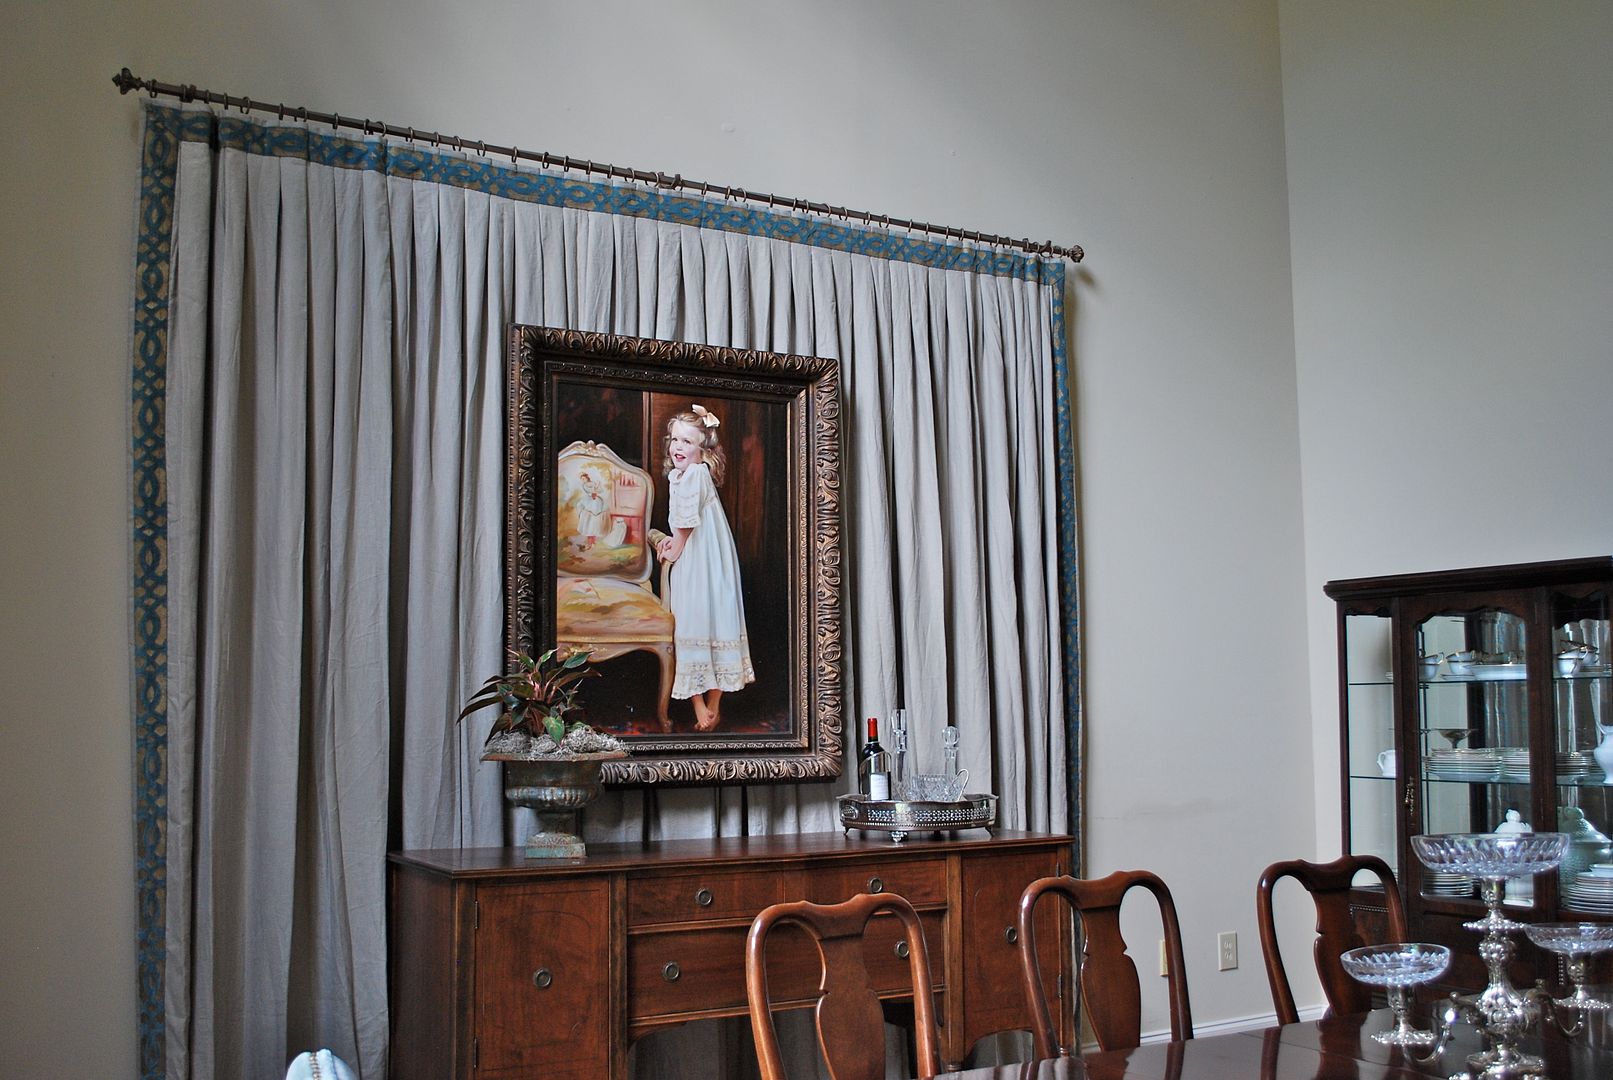
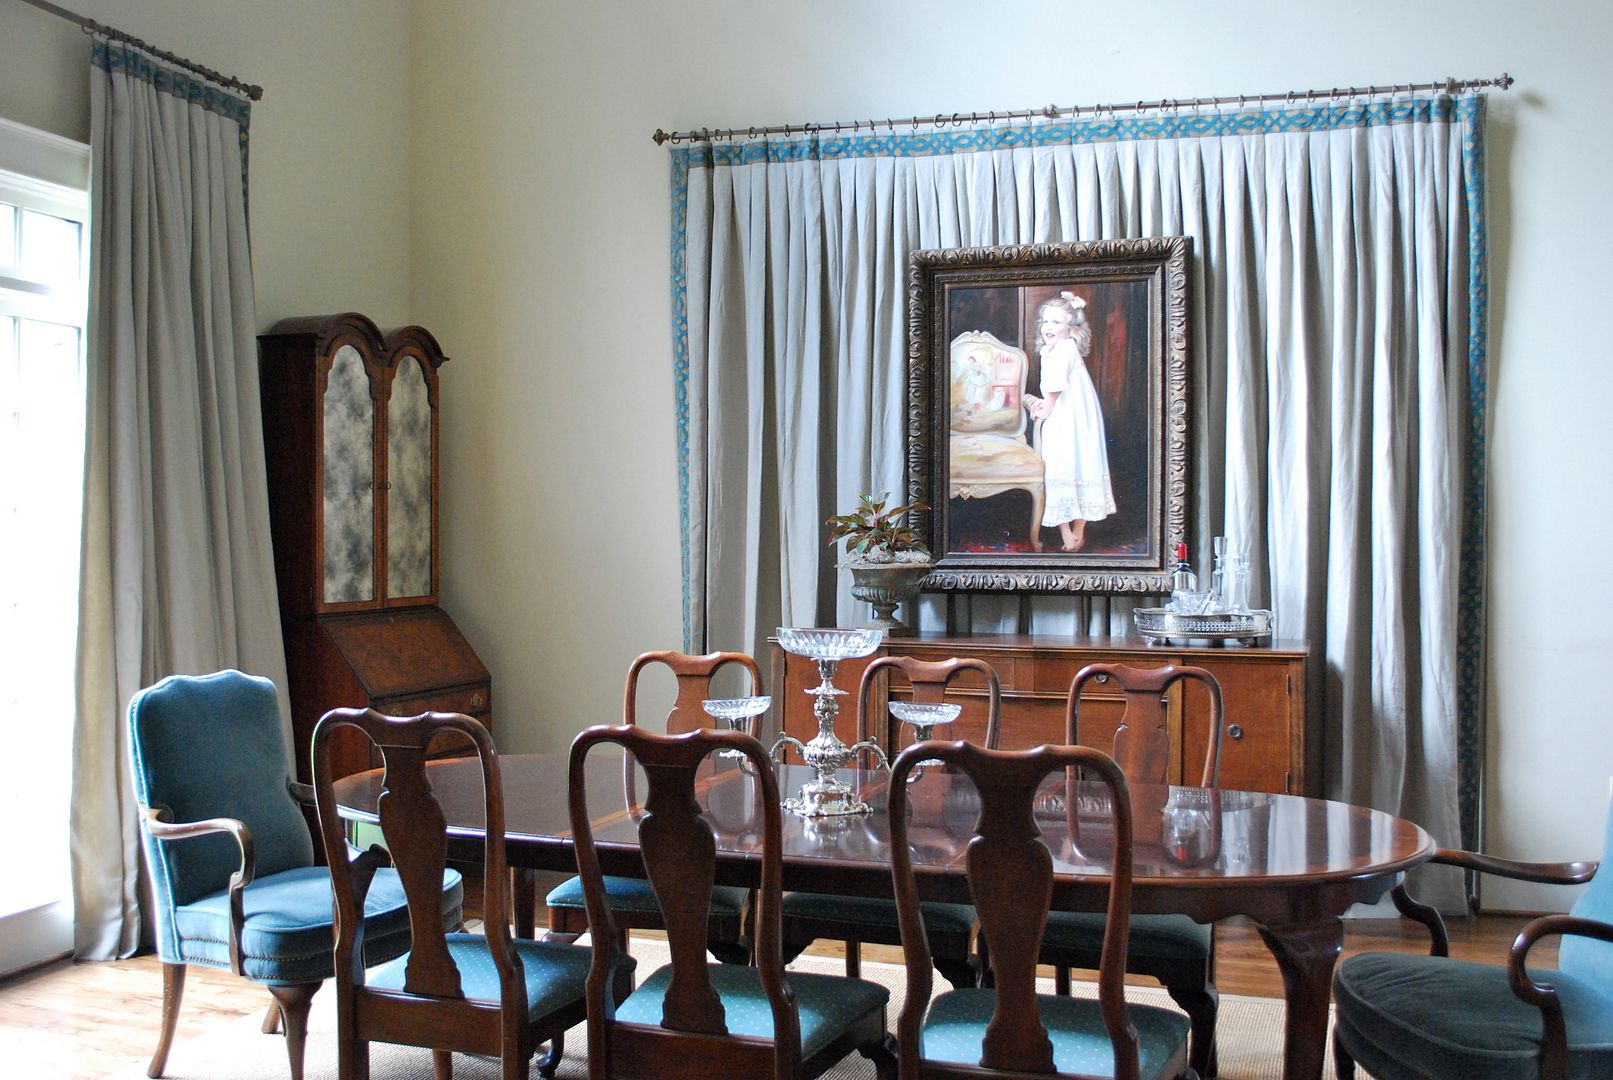
Jay Jeffers Office
Let's say there is a window or doorway in the exact spot where your nail needs to be to placed for the artwork. In these cases, you would still use a pair of panels (so you have a split opening for your nail). But this time you will place the nail (or cup hook) higher on the wall above the window/door where there is some wall space. Then you can suspend the painting from monofilament (aka fishing line) and adjust how low the painting will hang using the monofilament.

Alternatively, you could suspend the painting from monofilament which is wrapped around the drapery rod and down to the painting. Again, adjusting the two drapery panels to hide the monofilament. These techniques work great when the painting is not too heavy.
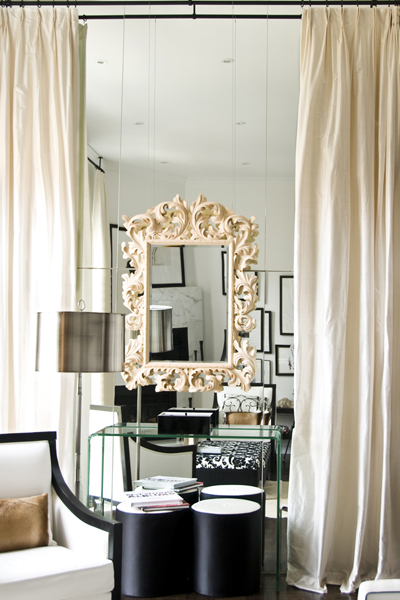
However, when your painting is heavy and large, you have to step it up a bit! Specifically, you must provide something for the lower corners of the painting to rest on that will "lift" the painting off the drapery wall. I used a 3" profile drapery bracket for this. If you will notice in the diagram below, I had my carpenter build a support across the doorway opening (since there was nothing there to secure my right lower bracket). This gave the painting balance and prevented the "crushing effect."

Also, I decided to go with one large panel rather than two since we were using a solid linen and it would have been difficult to hide the opening. I then punched a grommet through the panel at the precise place where the top bracket would fall on the drapery panel. I had to do this on site during installation, and I don't mind telling you it gave me sweaty palms to cut that gorgeous linen for the grommet! We threaded the bracket through the opening which allowed our painting to hang freely from the existing picture wire.

Alternatively, you could suspend the painting from monofilament which is wrapped around the drapery rod and down to the painting. Again, adjusting the two drapery panels to hide the monofilament. These techniques work great when the painting is not too heavy.
However, when your painting is heavy and large, you have to step it up a bit! Specifically, you must provide something for the lower corners of the painting to rest on that will "lift" the painting off the drapery wall. I used a 3" profile drapery bracket for this. If you will notice in the diagram below, I had my carpenter build a support across the doorway opening (since there was nothing there to secure my right lower bracket). This gave the painting balance and prevented the "crushing effect."
Also, I decided to go with one large panel rather than two since we were using a solid linen and it would have been difficult to hide the opening. I then punched a grommet through the panel at the precise place where the top bracket would fall on the drapery panel. I had to do this on site during installation, and I don't mind telling you it gave me sweaty palms to cut that gorgeous linen for the grommet! We threaded the bracket through the opening which allowed our painting to hang freely from the existing picture wire.
The result - a major focal point well worth all the effort. Enjoy your week - very excited for this sweater weather! M.